Animate text or objects
You can animate the text, pictures, shapes, tables, SmartArt graphics, and other objects in your PowerPoint presentation.
Effects can make an object appear, disappear, or move. They can change an object’s size or color. Effects can respond to mouse clicks or other actions, giving an interactive feel to your presentation.
Add animations to text, pictures, shapes, and more in your presentation
- Select the object or text you want to animate.
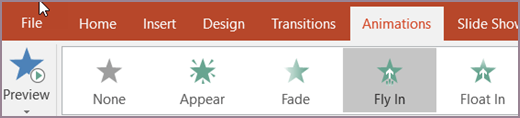
- Select Animations and choose an animation.
- Select Effect Options and choose an effect.
Manage animations and effects
There are different ways to start animations in your presentation:
- On Click: Start an animation when you click a slide.
- With Previous: Play an animation at the same time as the previous animation in your sequence.
- After Previous: Start an animation immediately after the previous one happens.
- Duration: Lengthen or shorten an effect.
- Delay: Add time before an effect runs.
Add more effects to an animation
- Select an object or text with an animation.
- Select Add Animation and choose one.
Change the order of animations
- Select an animation marker.
- Choose the option you want:
- Move Earlier: Make an animation appear earlier in the sequence.
- Move Later: Make an animation occur later in the sequence.
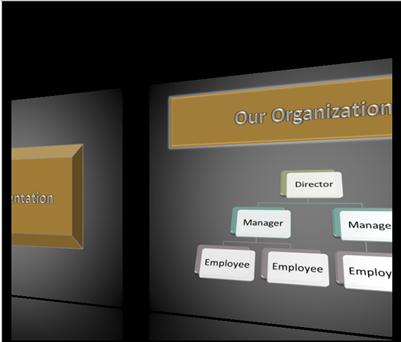
Add animation to grouped objects
You can add an animation to grouped objects, text, and more.
- Press Ctrl and select the objects you want.
- Select Shape Format > Group > Group to group the objects together.
- Select Animations and choose an animation.
Change, remove, or turn off animation effects in PowerPoint
Applies To
In PowerPoint, you can change one animation effect applied to an object for another, modify the settings for an animation, or remove the animation from the object.WindowsMacWeb
Change an animation effect
- Select the object that has the animation effect that you want to change.
- On the Animations tab, select the new animation that you want.
Remove one animation effect
You can remove animation effects that you previously applied to text or objects (such as pictures, shapes, SmartArt graphics, and so on).
Note: If you’re looking for information on removing a transition effect from an entire slide, see Add, change, or remove transitions between slides.
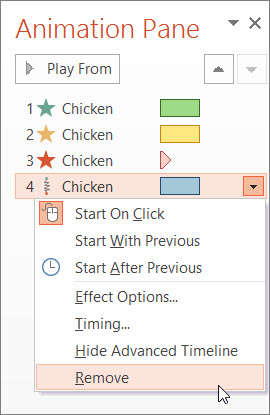
- On the Animations tab, select Animation Pane.
- On the slide, select the animated object that you want to remove the effect from.Tip: All of the effects applied to that object are highlighted in the Animation Pane.
- In the Animation Pane, select the effect you want to remove, select the down arrow, and then select Remove.

Remove more than one or remove all animation effects
- To remove more than one animation effect from text or an object, in the Animation Pane, press Ctrl, select each animation effect that you want to remove, and then press Delete.
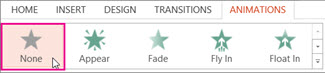
- To remove all animation effects from text or an object, select the object that you want to stop animating. Then, on the Animations tab, in the gallery of animation effects, select None.
Turn off all animations in a presentation
Although you can’t remove all animations from an entire presentation in one step (you have to remove animations from each object individually, as described above), you can disable all animations in your presentation.
- On the Slide Show tab, select Set Up Slide Show.
- Under Show options, select Show without animation.
Animate or make words appear one line at a time in PowerPoint
Applies To
An animation effect option called By Paragraph lets you make list items appear one at a time. This type of animation is sometimes called a build slide.WindowsmacOSWeb
Make text appear one line at a time
- On the slide, select the box that contains your text.
- Select the Animations tab, and then pick an animation, such as Appear, Fade In, or Fly In.
For some animations, such as Fly In, select Effects Options, as you’ll need to pick a direction for the bullets to fly in from, such as bottom, top, left, or right.
- Select Effect Options, and then select By Paragraph to make the paragraphs of text appear one at a time. (The other option, All at Once, makes all the lines of text appear at the same time.)PowerPoint immediately previews the animation for you.
By default, when you present in Slide Show, each paragraph appears in response to a click. That way, you control when each paragraph appears. You can modify this setting by using the Start, Duration, and Delay controls on the far end of the Animation tab of the ribbon.
Make text appear one letter at a time
You can also create a “typing” visual effect by making characters in a paragraph appear one at a time.
- On the slide, select the box that contains your text.
- Select the Animations tab, and then select the Add Animation drop-down menu to select an animation, such as Appear.
- Select the Animations tab, and then select Animation pane.The Animation Pane opens on the right side of the PowerPoint window.
- In the Animation Pane, select the arrow next to your animation, and select Effect Options.
- In the dialog box, on the Effect tab under Enhancements, select the arrow next to Animate text, and select By letter. Then you can change the delay time in the seconds delay between letters box.PowerPoint immediately previews the animation for you so that you can see the timing as the characters appear individually. You can repeat the preview by selecting the animation in the Animation Pane and selecting Play Selected.
Animate a picture on your slide
Applies To
To add some spirit to your presentation, you can add an animation effect to a picture or to shapes on your slides.
In this example, we’ll animate two pictures:
- Select the first picture.
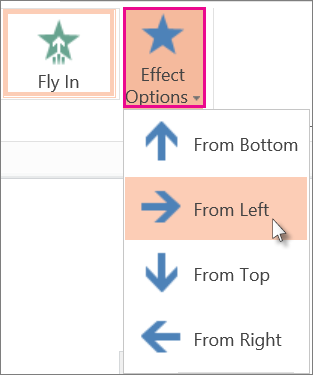
- On the Animations tab, select an animation effect. For example, select Fly In.
- Click Effect Options, and then pick a direction for the animation. For example, From Left.
- Select the second picture that you want to animate.
- On the Animations tab, pick Fly In.
- Click Effect Options and pick From Right.Tip: You can change the order of the animations by selecting a picture and, under Reorder Animation on the ribbon, clicking Move Earlier or Move Later.
- To test the animations you just applied to the two pictures, select the Slide Show button located at the bottom-right corner of the browser window:
- In slide show view, click a slide to start each animation.Tip: To remove an animation effect, in Normal view, select the picture, and on the Animations tab, click None.


Add, change, or remove transitions between slides
Applies To
A slide transition is the visual effect that occurs when you move from one slide to the next during a presentation. You can control the speed, add sound, and customize the look of transition effects.
Add slide transitions to bring your presentation to life
- Select the slide you want to add a transition to.
- Select the Transitions tab and choose a transition. Select a transition to see a preview.
- Select Effect Options to choose the direction and nature of the transition.
- Select Preview to see what the transition looks like.
Select Apply To All to add the transition to the entire presentation.
Remove a transition
A transition determines how a slide enters, and how the previous slide exits. So if (for example) you didn’t want a transition effect between slides 2 and 3, you would remove the transition from slide 3.
- Select the slide that has the transition you want to remove.
- On the Transitions tab, in the Transitions gallery, select None.If you want to remove all transitions from the presentation, after you select None, select Apply to All.
Change a transition
Only one transition effect can be applied to a slide at a time. So if a slide already has a transition effect applied to it, you can change to a different effect by going to the Transitions tab and simply selecting the effect you prefer.
If you want to change an existing effect by modifying the timing or direction of it, you can that by using the options on the Transitions tab of the ribbon, at the far end:
- Select the slide that has the transition you want to modify.
- On the Transitions tab, select Effect Options, then choose an option from the menu that appears.
- In the Timing group on the Transitions tab, you can change the duration of the effect. You can also specify whether the effect takes place after a mouse click or after a certain amount of time passes. There are also options for adding a sound to the transition effect or applying the transition to all slides in the slide show.
Set the timing and speed of a transition
Applies ToWindowsmacOS
You can modify the duration of a transition, modify the transition effect, and even specify a sound to play during a transition. Also, you can specify the time to spend on a slide before advancing to the next.
Set the speed of a transition
Use Duration to set transition speed. A shorter duration means that a slide advances faster, and a larger number makes the slide advance more slowly.
- Select the slide that has the transition that you want to modify.
- On the Transitions tab, in the Timing group, in the Duration box, type the number of seconds that you want.

Tip: If you want all the slide show’s transitions to use the same speed, click Apply to All.
Modify the effect options for a transition
Many, but not all, of the transitions in PowerPoint can be customized.
- Select the slide that has the transition you want to modify.
- On the Transitions tab, in the Transition to This Slide group, click Effect Options and select the option that you want.
In this example, a Gallery transition is applied to the slide and the From Right option is selected.
A Gallery transition, with the From Right option selected, during a presentation.
Specify a time to advance to the next slide
Advance Slide sets the transition timing by specifying how long a slide stays in view before the transition to the next slide begins. If no timing is selected, slides advance when you click the mouse.
- Select the slide that you want to set the timing for.
- On the Transitions tab, in the Timing group, under Advance Slide, do one of the following:
- To make the slide advance to the next slide when you click the mouse, select the On Mouse Click check box.
- To make the slide advance automatically, select the After check box, and then enter the number of minutes or seconds that you want. The timer starts when the final animation or other effect on the slide finishes.
- To enable both the mouse and automatic advance, select both the On Mouse Click check box and the After check box. Then, at After, enter the number of minutes or seconds that you want. The slide will advance automatically, but you can advance it more quickly by clicking the mouse.
Tip: If you want all the slides to advance using the same speed, click Apply to All.
Set a sound to play during a transition
- Select the slide that has the transition that you want to modify.
- On the Transitions tab, in the Timing group, in the Sound list, select the sound that you want.
Use the Morph transition in PowerPoint
The Morph transition allows you to animate smooth movement from one slide to the next.
You can apply the Morph transition to slides to create the appearance of movement in a wide range of things—text, shapes, pictures, SmartArt graphics, and WordArt. However, charts don’t morph.
Note: Morph is available if you have a Microsoft 365 subscription or are using newer standalone versions of Office. For Microsoft 365 subscribers using PowerPoint for the web, Morph is available when you are using files stored in OneDrive for work or school or SharePoint in Microsoft 365.
How to set up a Morph transition
To use the Morph transition effectively, you’ll need to have two slides with at least one object in common—the easiest way is to duplicate the slide and then move the object on the second slide to a different place or copy and paste the object from one slide and add it to the next. Then, apply the Morph transition to the second slide to see what Morph can do to automatically animate and move your object. Here’s how:
- In the Thumbnail pane on the left side, click the slide that you want to apply a transition to, which should be the second slide you added the object, picture, or words you’d like to apply the morph effect to.
- On the Transitions tab, select Morph.
Note: In PowerPoint for Android, select Transitions > Transition Effects > Morph.
- Select Transitions > Effect Options to choose just how you’d like the Morph transition to work.
You can move objects around on the slide, change colors, move words and characters around, and much more.
- Click Preview to see the Morph transition in action.

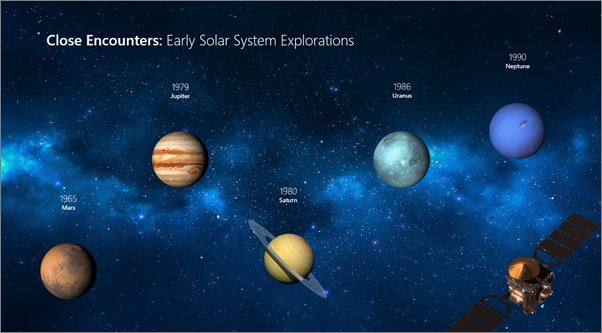
Here’s an example of how the Morph transition can seamlessly animate objects across slides.
This is the original slide:
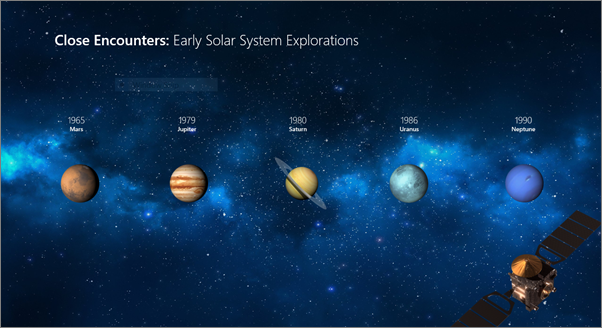
This is the second slide with the same objects after the Morph transition has been applied. The planets moved without needing individual motion paths or animations to be applied to them.
Requirements
See the following table to determine what you can do with Morph. We encourage you to get a Microsoft 365 subscription to stay up to date with the latest Office features, including Morph.