Add an email account to Outlook for Windows
There are many different types of email accounts you can add to Outlook, including an Outlook.com or Hotmail.com account, the work or school account you use with Microsoft 365, Gmail, Yahoo, iCloud, and Exchange accounts.
Select a tab option below for the version of Outlook you’re using. What version of Outlook do I have?New OutlookClassic Outlook
Note: If the steps under this New Outlook tab don’t work, you may not be using new Outlook for Windows yet. Select the Classic Outlook tab and follow those steps instead.
In this article:
Add a new account | Set as primary account | Remove account | Troubleshoot password issues
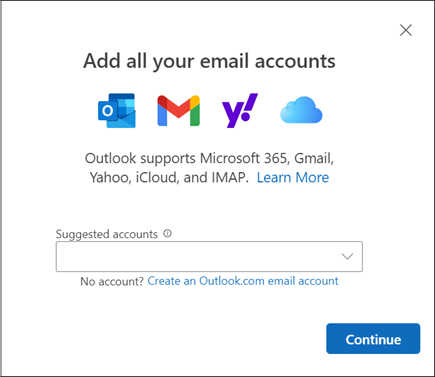
Add a new account in new Outlook
- On the View tab, select View settings, or from the File tab, select Account info.
- Select Accounts > Your accounts. You can now add a new account.
- Under Email accounts, select Add Account, and select a suggested account from the dropdown menu or enter a different email address. Select Continue.Note: Some non-Microsoft email providers, like Gmail, Yahoo, and iCloud, require you to change some settings on their websites before you can add these accounts to Outlook.
- If prompted, enter your password for the account and select Done.
Set as primary account in new Outlook
- On the View tab, select View settings, or from the File tab, select Account info > Accounts > Your accounts.
- In the Email accounts section, find the account you want to make changes to or delete. Beside the account name, select Manage.
- Under Account details, select Set as primary account.
- When you’re finished, select Return to accounts page, or close the Settings window
Remove an account in new Outlook
- On the View tab, select View settings, or from the File tab, select Account info > Accounts > Your accounts.
- In the Email accounts section, find the account you want to delete. Beside the account name, select Manage.
- Under Account details, select Remove to remove this account from Outlook. Any offline cached content for this account will be deleted when you remove the account.Note: This step only removes the account from the Outlook app, it doesn’t delete the account. To delete an account, get help from your email provider.
- For accounts where Microsoft isn’t the email provider (for example, Gmail, Yahoo, iCloud, and non-Microsoft IMAP and POP accounts), the Remove Account window appears. Select an option to remove the account from only this device or from all devices.
If you select, Remove from all devices, your account will be removed from all devices where you added your account to Outlook. - When you’re finished, select Return to accounts page, or close the Settings window.
Troubleshoot password issues when adding an account in new Outlook
Forgot your password
If you forgot the password for a Microsoft account, use our sign-in helper to get back into your account, or see Reset a forgotten Microsoft account password.
If you forgot your password for a work or school account, see Reset your work or school password using security info.
App password message
If you know you’re using the correct password for your email account, and you see a message such as:
- Please create an app password for Outlook on your email provider’s site.
App passwords are randomly generated one-time use passwords that provide temporary access to your online accounts. Temporary passwords act as a security layer, preventing the need to share your main account credentials with potentially less secure or unknown applications.
Depending on your email provider, an app password may be necessary to add certain account types to new and classic Outlook such as IMAP or iCloud accounts.
To add an app password, do the following:
- Go to your email provider to get the app password. Your email provider will provide instructions for how to generate an app password to use in email applications such as new and classic Outlook in place of your regular password. For instance, instructions for AOL are in Create and manage 3rd-party app passwords.
- After you get the app password from your provider, copy it, and then paste it when prompted for your account password in Outlook.
For specific help with adding a Gmail or iCloud account, see Add a Gmail account or Add or manage an iCloud email account.
Sync your account in Outlook to the Microsoft Cloud
Applies To
To enhance your Microsoft 365 experience in new Outlook for Windows, Outlook for iOS, Outlook for Android, and new Outlook for Mac, you can now sync your non-Microsoft accounts (including their emails, contacts, and events) to the Microsoft Cloud. This is available for Gmail, Yahoo, iCloud, and IMAP accounts in Outlook for iOS, Outlook for Android, and new Outlook for Mac. This is also available for Gmail and Yahoo accounts in new Outlook for Windows. This allows you to enjoy many features that were previously only available to those with Microsoft 365, or Microsoft Exchange Online email accounts.
What happens when I sync my account to the Microsoft Cloud?
Syncing your account to the Microsoft Cloud means that a copy of your email, calendar, and contacts will be synchronized between your email provider and Microsoft data centers. Having your mailbox data in the Microsoft Cloud lets you use the new features of the Outlook client (New Outlook for Windows, Outlook for iOS, Outlook for Android or Outlook for Mac) with your non-Microsoft account, just like with your Microsoft accounts.
Your experience on your native account and within any apps from that provider will remain unchanged.New OutlookiOS & Android
The ability to sync to the Microsoft Cloud is available to users of new Outlook for Windows for which, the following features are available for Gmail and Yahoo accounts.
- Mail search
- Create, read, update, delete folders
- Focused inbox
- My Day tool
- Flag tag
- Pinning emails
- @mentions inside emails
- Snooze notifications
- Mark emails as read/unread
- Mark as favorite (people, folders, groups)
- Check accessibility
- Respond to an email with a meeting request
- Rich editing, spelling, and auto complete suggestions powered by Microsoft Editor.
Calendar
- Recurring meetings
- Free, tentative, busy, OOF
- Mark as private
- RSVP in Preview
- RSVP in Grid
Contacts
- Add contacts
- Contact suggestions
Additional
- Travel and deliveries tracking
Print messages, calendars, or other Outlook items
Applies To
You can print contacts, messages, calendars, meetings, and tasks in Outlook. Each type of Outlook item has several different print options.
Select a tab option below for the version of Outlook you’re using. What version of Outlook do I have?New OutlookClassic OutlookWeb
Note: If the steps under this New Outlook tab don’t work, you may not be using new Outlook for Windows yet. Select Classic Outlook and follow those steps instead.
Print a message
- Select a message. From the ribbon select the Home tab, then select Print at the top.
- In the Print dialog box, select a printer, a layout, and which pages you want to print.
- Select Print.
Print a calendar
- From the navigation pane select
Calendar.
- On the Home tab, select Print.
- In the preview dialog, under Calendar, select the calendar you want to print.
- Under View, select the calendar layout you want, such as Work week or Month.
- Select a time range and whether you want a mini-month or a detailed agenda. (Each selection you make is immediately reflected in the preview image.)
- When you’ve selected the settings you want, go back to the Home tab and select Print.
- In the Print dialog, choose a printer, then select Print again.Tip: To save the calendar as a PDF file, under Printer, choose Microsoft Print to PDF.
Print a picture in an email
You can’t currently print a picture from the body of a message. However, here are some ideas.
- Right-click the image and select
Save image as. Save the image to your device. Then, from File Explorer, right-click the file and choose Print.Tip: If the picture looks cut off in the print preview, clear the Fit picture to frame box.
- Right-click the picture and choose
Copy image. Open Paint or another image editor, press Ctrl+V to paste it, then print the picture from the editor.
- If you receive the picture as an attachment, select the arrow next to the image and choose Download or Save to OneDrive.
How to search in Outlook
Applies To
Outlook’s search box is a powerful tool to help you find messages, contacts, tasks, and calendar entries.
You can type a number of phrases in the Search box at the top of the Outlook window. In addition to searching for different words and phrases, you can use various operators and keywords to narrow your search results.
To start your search, click the Search box at the top of the Outlook window. You’ll immediately see Suggested Searches. These suggestions are based on your search and message history. Any suggested search with a clock icon to the left will return all messages that contain the search string in the subject, message body, and even any Microsoft 365 attachments.
Note: Outlook uses what’s called prefix matching when searching. So if you type ray into the Search box, Outlook will return messages that contain ray, Ray, Raymond, and rays, but not disarray or tray. Also, the search treats numbers that are connected to words (no spaces between the word and the number) as part of the word. Searching for “365” will NOT find messages that contain “Microsoft365”.
In addition to suggested phrases, Outlook will also show you suggestions to help you search for messages from some of your most recently emailed contacts.
Search basics in Outlook
- When you type words into the Search box, Outlook scans both email messages and many types of attachments for that word or phrase. For example, if you search for “project” either with or without quotes, Outlook will return all messages with the word project, projects, projector, projecting, etc. anywhere in the sender name, subject, message body, or attachments.
- When you type in an email address, for example cheryl.parsons64@yahoo.com, Outlook returns all email messages that contain that email address anywhere in the subject, message body, or many types of attachments as well as messages from that email address. To limit your search results to emails from an email address, type from:cheryl.parsons64@yahoo.com in the search box.
- When searching for an email by its subject line, the search will be more effective if you search for only a few words in the subject line. For example, to find an email with the subject Spring Planning Meeting Agenda 04/05/2021, search for Spring Planning or Meeting Agenda.
- Punctuation is ignored in the search box. Entering “Spring Planning Meeting.” is the same as entering “Spring Planning Meeting” without a period.
- Strings of numbers less than five digits are ignored. If you want to search for 98101, entering 9810 will not return any results.
- If your mailbox is hosted on Exchange 2019 or Exchange Online, strings of numbers starting with a currency (i.e., USD 123456) where online search uses MAPI restrictions (more info here) can only be searched either specifying the currency and the number (USD123456), putting NN in front of the number (NN123456), or currency [Space] and the number (USD 123456). Specifying the number itself (123456) won’t return any results.
- To keep Outlook running smoothly, only the first 1,000 search results are returned. If this list doesn’t contain the items you’re searching for, try a more specific search.
- Searching for terms that contain more than one language may return inconsistent results.
Use Outlook’s built-in search filters
Outlook provides you with a number of built-in search filters. To use the built-in filters, click in the Search box. Based on your preference, you can use Advanced Search by clicking the filter button on the right side of the search box. Alternatively, the Outlook ribbon will change to show the Search tab and you use any of the options in the Refine group to refine your search results.
You can find the search box at the top of the screen whether you are using the Simplified Ribbon or the Classic Ribbon.
Search reference tables for Outlook
The following table shows you some examples of searches you might find useful. In addition to these examples, you can use AND, NOT, OR, <, >, =, and other operators to refine your search. Operators should be typed in uppercase letters.
| Type this | To find this |
|---|---|
| bob | Items containing bob, bobbinbobby, BOBBY, BoBby, or any other combination of uppercase and lowercase letters. Instant Search is not case sensitive. This will NOT find items containing abcBOBdef, or 123bob. |
| bob moore | Items containing bob, along with all of the variations listed in the previous row, or moore, along with any other words that contain moore, but not necessarily in that order. |
| bobby AND moore | Items containing both bobby and moore, but not necessarily in that order. Note that logical operators such as AND, NOT, and OR must be in uppercase letters. |
| bobby NOT moore | Items containing bobby, along with all variations listed in the first row of the table, but not moore. |
| bobby OR moore | Items containing bobby, along with all variations listed in the first row of the table, moore, or both. |
| “bob” | Items containing the exact phrase bob and not the variations such as bobby or bobbin. To search for an exact string, you must use quotation marks. |
| from:”bobby moore” | Items sent from bobby moore. Note the use of double quotes so that the search results match the exact phrase within the quotes.You can also type from: and then the first few letters of a contact’s name and Outlook will suggest a list of contacts for you to select. |
| from:”bobby moore” about:”status report” | Items sent from bobby moore where status report appears in the subject line, body, or attachment contents. Note the use of double quotes so that the search results match the exact phrase within the quotes. |
| hasattachment:yes | Items that have attachments. You can also use hasattachment:true to get the same results. |
| attachments:presentation.pptx | Items that have attachments named presentation.pptx or an attachment that contains presentation.pptx within its contents. |
| subject:”bobby moore” | Items whose subject contains the phrase bobby moore. |
| cc:”bobby moore” | Items in which the display name bobby moore is on the Cc line. |
| cc:bobbymoore@contoso.com | Items in which the e-mail address bobbymoore@contoso.com is on the Cc line. |
| bcc:bobby | Items in which bobbyy is on the Bcc line. |
| category:red | Items that contain a category name that includes the word red. For example “Red category” or “Redo” or “Redundant.” |
| messagesize:<10 KB | Items whose size is less than 10 kilobytes. Note the use of the “less than” comparison operator (<). |
| messagesize:>5 MB | Items whose size is larger than 5 megabytes. Note the use of the “greater than” comparison operator (>). |
| due:last week | Items that are flagged for follow up a due date. |
| messagesize:tiny | Items whose size is less than 10 kilobytes. Note- This is not supported in New Outlook for Windows |
| messagesize:small | Items whose size is between 10 and 25 kilobytes Note- This is not supported in New Outlook for Windows |
| messagesize:medium | Items whose size is between 25 and 100 kilobytes Note- This is not supported in New Outlook for Windows |
| messagesize:large | Items whose size is between 100 and 500 kilobytes Note- This is not supported in New Outlook for Windows |
| messagesize:verylarge | Items whose size is between 500 kilobytes and 1 megabyte Note- This is not supported in New Outlook for Windows |
| followupflag:follow up | Items that are flagged using the Follow Up flag. |
| messagesize:enormous | Items whose size is larger than 5 megabytes Note- This is not supported in New Outlook for Windows |
| hasflag:true | Items that are flagged for follow up. |
| from:bobby (received:1/7/21 OR received:1/8/21) | Items from bobby that arrived on either 1/7/21 or 1/8/21. Note the use of parentheses to group the dates. |
| received:1/15/2021 | Items that arrived on 01/15/2021. |
| received:”this week” | Items that arrived this week. Note the use of quotations when searching multi-word dates.Relative dates For example: today, yesterdayMulti-word relative dates For example: this week, last week, last month, last yearNotes: Starting in Outlook for Windows build 16.0.14314, the Received refiner is powered by Microsoft Search to make it easier to find mail outside the local sync window. You may notice slight differences in behavior.Support has been dropped for days of the week and months referred to by name, Tuesday, March, etc. |
| to:bobby | Items that you sent to bobby when you are searching in the Sent Items folder. |
| read:no | Items that have not been read. You can also use read:false to get the same results. |
| subject:status received:May | Items received from anyone during the month of May (any year) where the subject contains status. |
Calendar Searches in Outlook
The following searches will only return the proper results when run from a Calendar folder.
| Type this | To find this |
|---|---|
| startdate:next week subject:status | Calendar items next week where the subject contains status. |
| is:recurring | Calendar items that are recurring. |
| organizer:bobby | Calendar items where bobby is the organizer. |
Contact Searches in Outlook
The following searches will only return the proper results when run from a Contacts folder.
| Type this | To find this |
|---|---|
| firstname:bobby | Contacts that contain bobby in the First Name field. |
| lastname:moore | Contacts that contain moore in the Last Name field. |
| nickname:bobby | Contacts that contain bobby in the Nickname field. |
| jobtitle:physician | Contacts that contain physician in the Job Title field. |
| businessphone:555-0100 | Contacts that contain 555-0100 in the Business Phone field. |
| homephone:555-0100 | Contacts that contain 555-0100 in the Home Phone field. |
| mobilephone:555-0100 | Contacts that contain 555-0100 in the Mobile Phone field. |
| businessfax:555-0100 | Contacts that contain 555-0100 in the Business Fax field. |
| businessaddress:(4567 Main St., Buffalo, NY 98052) | Contacts that contain 4567 Main St., Buffalo, NY 98052 in the Business Address field. Note the use of parentheses to enclose the address. |
| homeaddress:(4567 Main St., Buffalo, NY 98052) | Contacts that contain 4567 Main St., Buffalo, NY 98052 in the Home Address field. Note the use of parentheses to enclose the address. |
| businesscity:buffalo | Contacts that contain buffalo in the Business City field. |
| businesspostalcode:98052 | Contacts that contain 98052 in the Business Postal Code field. |
| street:(4567 Main St) | Contacts that contain 4567 Main St in the Business Address Street field. Note the use of parentheses to enclose the address. |
| homestreet:(4567 Main St) | Contacts that contain 4567 Main St in the Home Address Street field. Note the use of parentheses to enclose the address. |
| birthday:6/4/1960 | Contacts that contain 6/4/1960 in the Birthday field. |
| webpage:www.contoso.com | Contacts that contain the URL http://www.contoso.com in the Web Page Address field. |
Keyboard shortcuts for Outlook
Applies To
Many users find that using an external keyboard with keyboard shortcuts for Outlook helps them work more efficiently. Keyboard shortcuts can be easier than a touchscreen and are an essential alternative to using a mouse.
Important: Steps may be different between new and classic Outlook for Windows. To determine which version of Outlook you’re using, look for Settings on the ribbon. If there’s no Settings option, follow the steps under the Classic Outlook tab. If the Settings option appears, select the tab for New Outlook.New OutlookClassic OutlookOutlook on the web
Notes:
- The shortcuts in this topic refer to the US keyboard layout. Keys for other layouts might not correspond exactly to the keys on a US keyboard.
- A plus sign (+) in a shortcut means that you need to press multiple keys at the same time.
- A comma sign (,) in a shortcut means that you need to press multiple keys in order.
This article describes the keyboard shortcuts in new Outlook for Windows. While many shortcuts are the same as in classic Outlook, there are some differences.
Tip: To quickly find a shortcut in this article, press Ctrl+F, and then type your search terms.
In this topic
- Frequently used shortcuts
- Edit text
- Format text
- Mail keyboard shortcuts
- Calendar keyboard shortcut
- Contacts (People) keyboard shortcuts
- Use keyboard shortcuts to add accent marks and special characters
Frequently used shortcuts
This table lists the most frequently used shortcuts in new Outlook
| To do this | Press |
|---|---|
| Create a new message or calendar event. | Ctrl+N |
| Open the selected message in a new window. | Shift+Enter |
| Delete message or item. | Delete |
| Forward message. | Ctrl+F |
| Go to Calendar. | Ctrl+2 |
| Select the Reply All option. | Ctrl+Shift+R |
| Reply to email message. | Ctrl+R |
| Send an email message. | Ctrl+Enter |
| Open split buttons. | Alt+Down arrow key |
| Open keyboard shortcuts. | Question mark (?) |
| Key tips. | Alt |
Edit text
The text editing keyboard shortcuts in new Outlook are the same as those in other Microsoft products.
| To do this | Press |
|---|---|
| Copy your selection to the clipboard. | Ctrl+C |
| Cut the text you selected. | Ctrl+X |
| Delete selected text or characters to the left of the cursor. | Backspace |
| Delete the word to the left of the cursor, but not the space before the word. | Ctrl+Backspace |
| Insert a hyperlink. | Ctrl+K |
| Paste content from the clipboard into the current location. | Ctrl+V |
| Repeat the most recent action. | Ctrl+Y |
| Reverse the most recent action. | Ctrl+Z |
Format text
The text formatting keyboard shortcuts in new Outlook are the same as those in other Microsoft products.
| To do this | Press |
|---|---|
| Apply bold formatting. | Ctrl+B |
| Apply italic formatting. | Ctrl+I |
| Underline text. | Ctrl+U |
Mail keyboard shortcuts in new Outlook
Use the Folder pane
| To do this | Press |
|---|---|
| Go to the Folder pane. | Ctrl+Y |
| Quick jump to the folder name | Any alphanumeric key |
| Collapse the selected section. | Left arrow key |
| Expand the selected section. | Right arrow key |
Use the message and reading list
The keyboard shortcuts for new Outlook in the below table can be used to perform the same action in both the message list and the reading list.
| To do this | Press |
|---|---|
| Delete the selected message. | Delete |
| Mark the selected conversation or message as read. | Ctrl+Q |
| Mark the selected conversation or message as unread. | Ctrl+U |
| Permanently delete the selected message or item. | Shift+Delete |
| Flag a message or mark a flagged message as complete. | Insert |
| Cancel a search. | Esc |
| Go to the next message | Ctrl+> |
| Go to the previous message | Ctrl+< |
Use the message list
The keyboard shortcuts for new Outlook in the below table are message list specific.
| To do this | Press |
|---|---|
| Select the current and next message in the list. Use this to select multiple, contiguous messages. | Shift+Down arrow key |
| Select the current and previous messages in the list. Use this to select multiple, contiguous messages. | Shift+Up arrow key |
| Select the first message in the folder. | Home or Ctrl+Home |
Use the reading list
The keyboard shortcuts for new Outlook in the below table are reading list specific.
| To do this | Press |
|---|---|
| Close a new message. | Esc |
| Create a new message. | Ctrl+N |
| Forward a selected message. | Ctrl+F |
| Go to the bottom of a conversation or message. | End |
| Go to the top of a conversation or message. | Home |
| Move down one page for conversations or messages of two or more pages. | Page down |
| Move up one page for conversations or messages of two or more pages. | Page up |
| Reply to the selected message. | Ctrl+R |
| Reply to the sender and all recipients of the selected message. | Ctrl+Shift+R |
| Send a message. | Ctrl+Enter |
Calendar keyboard shortcuts in new Outlook
Notes:
- The keyboard shortcuts for the Calendar in Teams and Outlook are the same. For Teams shortcuts, go to Keyboard shortcuts for Microsoft Teams.
- If you’re using Outlook on a Mac, go to Keyboard shortcuts in Outlook for Mac.
| To do this | Press |
|---|---|
| Open the calendar view. | Ctrl+2 |
| Create a new calendar item. | Ctrl+N |
| Open the selected item. | Enter |
| Delete the selected item. | Delete |
| Switch the view to include today. | No shortcut |
| In Day view, move to the previous day. In Week and Work Week views, move to the previous week. In Month view, move to the previous month. | Moving days: Ctrl+Alt+Left arrow keyMoving weeks: Alt+Down arrow keyMoving months: Alt+PageDown |
| In Day view, move to the next day. In Week and Work Week views, move to the next week. In Month view, move to the next month. | Moving days: Ctrl+Alt+Right arrow keyMoving weeks: Alt+Up arrow keyMoving months: Alt+PageUp |
| Navigate to the previous pane in the calendar view. | No shortcut |
| Navigate to the next pane in the calendar view. | No shortcut |
| Move to a different region in the calendar. | F6 or Ctrl+Shift+Tab |
| Move to the next event or area in the current view. | Tab key |
| Move to a previous event or area in the current view. | Shift+Tab |
| Go to the next time period. | Ctrl+Alt+Right arrow key |
| Go to the previous time period. | Ctrl+Alt+Left arrow key |
| Go to today. | Alt+Shift+Y/Home |
| Move to a different region in the calendar. | No shortcut |
| Switch to Day view. | Ctrl+Alt+1 |
| Switch to full Week view. | Ctrl+Alt+2/Alt+”-“ |
| Switch to Month view. | Ctrl+Alt+4/Alt+”=” |
| Switch to Work week view. | Ctrl+Alt+2 |
| Switch to three-day view. | Alt+3 |
| List view. | No shortcut |
| Invite Attendees. | CTRL+N (Create New Event) |
Contacts (People) keyboard shortcuts
The People view is your address book in Outlook where your personal contacts are stored and where you can open any address book that has been set up for your organization. The Mail, Calendar, Copilot and People views work together so you can easily send mail to and schedule appointments with your most important people.
| To do this | Press |
|---|---|
| Go to Mail. | Ctrl+1 |
| Go to Calendar. | Ctrl+2 |
| Go to Copilot. | Ctrl+3 |
| Go to People. | Ctrl+4 |
| Delete a contact or contact list. | Delete or Ctrl+D |
| Create a contact. | Ctrl+N |
| Search for a contact. | Ctrl+E |
| Discard contact. | Esc |
| Save a contact or contact list. | Ctrl+S |
| Select all contacts or contact lists. | Ctrl+A |
| Unselect all contacts or contact lists. | Esc |
| Edit a contact or contact list. | Shift+E |
| Move down in the contact list or hub list. | Down arrow key |
| Move up in the contact list or hub list. | Up arrow key |
| Create a contact list. | Ctrl+L |
| Display the list of People keyboard shortcuts. | Shift+Question mark (?) |
| Move the focus to the Home tab. | Alt, H |
| Move the focus to the View tab. | Alt, V |
Use keyboard shortcuts to add accent marks and special characters for new Outlook
To add accents or special characters in new Outlook, use the number pad on your external keyboard with Num Lock turned on.
- Press and hold Alt.
- Type the numeric code on the number pad and release Alt.
Vowels with accents
The following table lists vowels with accent marks and the Alt code for them in new Outlook.
| Uppercase vowel with grave accent | Press |
|---|---|
| À | 0192 |
| È | 0200 |
| Ì | 0204 |
| Ò | 0210 |
| Ù | 0217 |
| Lowercase vowel with grave accent | Press |
|---|---|
| à | 0224 |
| è | 0232 |
| ì | 0236 |
| ò | 0242 |
| ù | 0249 |
| Uppercase vowel with acute accent | Press |
|---|---|
| Á | 0193 |
| É | 0201 |
| Í | 0205 |
| Ó | 0211 |
| Ú | 0218 |
| Ý | 0221 |
| Lowercase vowel with acute accent | Press |
|---|---|
| á | 0224 |
| é | 0233 |
| í | 0237 |
| ó | 0243 |
| ú | 0250 |
| ý | 0253 |
| Uppercase vowel with circumflex accent | Press |
|---|---|
| Â | 0194 |
| Ê | 0202 |
| Î | 0206 |
| Ô | 0212 |
| Û | 0219 |
| Lowercase vowel with circumflex accent | Press |
|---|---|
| â | 0226 |
| ê | 0234 |
| î | 0238 |
| ô | 0244 |
| û | 0251 |
| Uppercase vowel with tilde accent | Press |
|---|---|
| Ã | 0195 |
| Ñ | 0209 |
| Õ | 0213 |
| Lowercase vowel with tilde accent | Press |
|---|---|
| ã | 0227 |
| ñ | 0241 |
| õ | 0245 |
| Uppercase vowel with umlaut accent | Press |
|---|---|
| Ä | 0196 |
| Ë | 0203 |
| Ï | 0207 |
| Ö | 0214 |
| Ü | 0220 |
| Ÿ | 0159 |
| Lowercase vowel with umlaut accent | Press |
|---|---|
| ä | 0228 |
| ë | 0235 |
| ï | 0239 |
| ö | 0246 |
| ü | 0252 |
| ÿ | 0255 |
Punctuation, consonants, and special vowels
| Mark, letter, symbol, or character | Press |
|---|---|
| Inverted exclamation mark (¡) | 0161 |
| Inverted question mark (¿) | 0191 |
| Uppercase C-cedilla (Ç) | 0199 |
| Lowercase c-cedilla (ç) | 0231 |
| Uppercase OE diphthong (Œ) | 0140 |
| Lowercase oe diphthong (œ) | 0156 |
| Eszett or ss (ß) | 0223 |
| Masculine ordinal indicator or degree symbol (º) | 0186 |
| Feminine ordinal indicator (ª) | 0170 |
| Uppercase O with a stroke (Ø) | 0216 |
| Lowercase o with a stroke (ø) | 0248 |
| Uppercase A with an overring, A-ring (Å) | 0197 |
| Lowercase a with an overring, A-ring (å) | 0229 |
| Uppercase AE diphthong or uppercase ash (Æ) | 0198 |
| Lowercase ae diphthong or lowercase ash (æ) | 0230 |
| Uppercase thorn (Þ) | 0222 |
| Lowercase thorn (þ) | 0254 |
| Uppercase eth (Ð) | 0208 |
| Lowercase eth (ð) | 0240 |
| Double left angled quotation mark («) | 0171 |
| Double right angled quotation mark (») | 0187 |
| Single left angled quotation mark (‹) | 0139 |
| Single right angled quotation mark (›) | 0155 |
| Uppercase S with caron (Š) | 0138 |
| Lowercase s with caron (š) | 0154 |
| Uppercase Z with caron (Ž) | 0142 |
| Lowercase z with caron (ž) | 0158 |
Special characters
| Character | Press |
|---|---|
| Cent symbol ¢ | 0162 |
| Copyright symbol © | 0169 |
| Dagger symbol † | 0134 |
| Double dagger symbol or diesis ‡ | 0135 |
| Pound sign £ | 0163 |
| Euro sign € | 0128 |
| Yen sign ¥ | 0165 |
| Function sign ƒ | 0131 |
| Currency sign ¤ | 0164 |
| Registered trademark symbol ® | 0174 |
| Trademark symbol ™ | 0153 |
| Bullet • | 0149 |
| En dash – | 0151 |
| Em dash — | 0150 |
| Section sign § | 0167 |
| Paragraph sign or pilcrow ¶ | 0182 |
Basic tasks using a screen reader with email in Outlook
Applies To
This article is for people who use a screen reader program such as Windows Narrator, JAWS, or NVDA with Windows tools or features and Microsoft 365 products. This article is part of the Accessibility help & learning content set where you can find more accessibility information on our apps. For general help, visit Microsoft Support.New OutlookClassic OutlookOutlook for iOSOutlook for AndroidOutlook on the web
Use the new Outlook for Windows with your keyboard and the accessibility tool Screen Reader to perform essential basic tasks. You can create and send new emails, read and reply to received emails, search emails, work with attachments, and more.
Notes:
- To learn more about screen readers, go to How screen readers work with Microsoft 365.
- This topic assume that the Reading pane is off, go to Toggle off the reading pane.
- With NVDA, when you are in a text box, you might need to switch to focus mode manually to be able to type text. For more information, go to https://www.nvaccess.org/get-help/.
- To download the classic outlook, go to Outlook for Windows (classic).
- In the new Outlook for Windows, use the toggle button at the top right to switch back to classic Outlook.
Read and reply to, or forward an email in new Outlook
Use your screen reader and keyboard shortcuts to read and respond to emails. You hear a sound when a new email has arrived.
Tip: It is easier to navigate the messages if you do not use the Conversation view. For instructions, go to Toggle off the conversation view.
Read an email
Navigate to an email in the message list in new Outlook and hear your screen reader read the email and its details.
Note: The reading pane must be off before you follow these instructions. For instructions, go to Toggle off the reading pane.
- In the new Outlook main view, press F6 or Shift+F6 until you hear “Message list.”
- Press the Down or Up arrow key to find desired email.
- Press Enter or Shift+Enter to open the message in the content pane.
- To read through the whole email with Narrator, press Narrator+Ctrl+R or Narrator+Down arrow key. With JAWS and NVDA, the message will automatically read aloud upon opening. To reread the message from the beginning with JAWS and NVDA, press Ctrl+Home, then press Screen Reader key+Down arrow key. To stop reading, press Ctrl. To close the email and return to the message list, press Esc.
Reply to an email
Use your screen reader to promptly respond to your emails in new Outlook.
- In an email or when on an email on the message list, press Ctrl+R. If you want to reply to all, press Ctrl+Shift+R.
- Type your reply, to send the email, press Ctrl+Enter.
Forward an email
You can easily forward an email using keyboard shortcuts and your screen reader.
- In an email or when on an email on the message list, press Ctrl+F.
- Type the name or email address of the recipient. When you start writing, new Outlook offers you matching suggestions. To browse the suggestions, press the Down arrow key. If you find the right persons among the suggestions, press Enter to add them to the To field.
- Press the Tab key until you hear “Message body,” and type your message.
- To send the email, press Ctrl+Enter.
Create and send an email in new Outlook
Let your screen reader help you create a new email and get your message out there.
- In the new Outlook main view, press Ctrl+N. With Narrator, you hear “New Outlook window, To, edit.” With JAWS and NVDA, you hear “New mail.” The focus is on the To field of the new email.
- Type the name or email address of the recipient. When you start writing, new Outlook offers you matching suggestions. To browse the suggestions, press the Down arrow key. If you find the right persons among the suggestions, press Enter to add them to the To field.
- If you want to send a copy of the email to someone, press the Tab key until you hear “Cc, edit.” Type the email address of the copy recipient.
- Press the Tab key until you hear “Add a subject,” and type a subject for the email.
- Press the Tab key until you hear “Message body,” and type your message.
- To send the email, press Ctrl+Enter.
Recall an email in new Outlook
You can use message recall feature in Outlook to pull back an email after it has been sent. This is useful when you forget to attach a file, send the message to the wrong recipient, or need to correct the content.
Note: Message recall is available only if both you and the recipient have a Microsoft 365 work or school email account in the same organization.
- In the New Outlook main view, press F6 or Shift+F6 until you hear “Inbox.” Then press the Down arrow key to Sent Items and press Enter.
- Use the Up or Down arrow key to select the email, and then press Enter.
- Press Tab key until you hear “Message action toolbar,” then navigate with the Right arrow key to the More actions buttonand press Enter.
- Use the Up or Down arrow key until you hear “Advanced actions menu items,” and then press Enter.
- Use the Up or Down arrow key until you hear “Recall message,” and then press Enter.
- Press the Tab key until you hear “Ok button,” and then press Enter to Recall a message.Note: Shortly after submitting a recall request, you will receive an email titled “message recall report,” which contains a link indicating whether the recall succeeded, is pending, or failed.
Search for an email in new Outlook
Waste no time digging through lists or archives for that important email. Use search to quickly find what you’re looking for.
- In the new Outlookmain view, press Ctrl+E. With Narrator, you hear “Banner, Search, edit.” With JAWS, you hear “Search, edit.” With NVDA, you hear “Banner landmark, Search landmark.”
- Type your search words and browse suggestions with the Down arrow key, and then press Enter.
- Use the Down and Up arrow keys to browse the list. To clear the search words and return to the new Outlook main view, press F6 until you hear “Mail toggle, button.”
- Press Shift+Tab until you hear “Exit search, button,” and then press Enter.
Add attachments in new Outlook
You can send files like resumes, newsletters, or cute kitty cat pics as copies or as OneDrive files.
Add a file as a OneDrive link
- When you’re composing a new mail, press F6 to go to the ribbon tab.
- Press the Right arrow key until you hear “Insert tab.”
- Press the Tab key until you hear “Attach file, button,” and then Press Enter.
- Press the Down arrow key until you hear “OneDrive,” and then press Enter. The focus is on your OneDrive Recent folder.
- To change to a different folder, press Shift+Tab until you hear “Select files from,” and then use the Down and Uparrow keys to browse the folders. Press Enter to select.
- In the file list, press the Up or Down arrow key until you hear the file you want to attach, and then press Enter.The link to the OneDrive file is added to the message.
Add a local file from your computer
- When you’re composing a new mail in new Outlook, press F6 to go to the ribbon tab.
- Press the Right arrow key until you hear “Insert tab.”
- Press the Tab key until you hear “Attach file, button.” Press Enter.
- Press the Down arrow key until you hear “Browse this computer,” and then press Enter.
- Use the Tab key and arrow key to navigate to the file you want to attach, and press Enter.
Print an email in new Outlook
You can print your email on paper or to a file.
- In the reading pane, on the email, press the Shift+Tab key until you hear “Message actions tool bar.”
- Press the Right arrow key until you hear “More actions,” and then press Enter.
- Press the Down arrow key until you hear “Print menu item,” and then press Enter.
- Select the printing options. To navigate between the options, press the Tab key. To expand option menus, press Spacebar. To move between radio buttons, use the Down and Up arrow keys. To select an option, press Enter.
- To print, press the Tab key until you hear “Print button,” and then press Enter.
Modify settings in new Outlook
Turn off the Conversation view in new Outlook
It’s easier to navigate the messages if you don’t use the Conversation view.
- In new Outlook, press the Tab key or Shift+Tab until you hear “Settings button,” and then press Enter to open the Settings pane.
- Press the Tab key until you hear “Accounts tab.” Then press the Down arrow key until you hear “Mail tab,” and then press Enter.
- Press the Tab key until you hear “Layout tab, selected.”
- Press the Tab key to navigate the Layout settings. Do one of the following:
- With Narrator and NVDA, press the Tab key until you hear “How do you want your messages list organized?” Then confirm the radio button has Groupe message by conversation selected. Press the Tab key until you hear “Arrange the reading pane.” Then press the Down arrow key to move to the radio button to the Show each message separately setting. The radio button will automatically be selected as you navigate to it.
- With JAWS, press the Tab key until you hear “Show email grouped by conversation, radio button, checked.” Keep the Show email grouped by conversation radio button selected. Press the Tab key once more and hear “Newest on top” or “Newest on bottom,” then press the Down arrow key to move to the radio button to the Show each message separately setting. The radio button will automatically be selected as you navigate to it.
- Press Tab until you hear “Save button,” and press Enter to save your settings changes.
- Press Esc to close the Settings pane.
Turn off the reading pane in new Outlook
The instructions in this topic assume that the Reading pane is off.
- Press the Tab key or Shift+Tab until you hear “Settings button,” and then press Enter to open the Settings pane.
- Press the Tab key until you hear “Accounts tab.” Then press the Down arrow key until you hear “Mail tab,” and then press Enter.
- Press the Tab key until you hear “Layout tab selected.” Keep that selection and do one of the following:
- With Narrator and NVDA, press the Tab key until you hear “Where do you want the reading pane to appear?” Then press the Down arrow key until you move to the Hide reading pane radio button. The radio button will automatically be selected as you navigate to it.
- With JAWS, press the Tab key until you hear “On the right” or “At the bottom,” then press the Down arrow key until you hear “Hide reading pane radio button.” The radio button will automatically be selected as you navigate to it.
- Press Tab until you hear “Save button,” and press Enter to save your settings changes.
- Press Esc to close the Settings pane.
Use Dark mode in new Outlook
If you are using new Outlook in a dark room, using the Dark mode puts less strain on your eyes.
- In the new Outlookmain view, press the Tab key or Shift+Tab until you hear “Settings button,” and then press Enter.
- Press the Tab key until you hear “Accounts tab.” Then press the Down arrow key until you hear “General tab,” and then press Enter.
- Press the Tab key until you hear “Language and time tab selected.” Press the Down arrow key once to move to the Appearance tab, and press Enter.
- Press the Tab key to navigate the Appearance settings.
- Press the Right arrow key until you hear “Dark radio button.”
- Press Tab until you hear “Save button,” and press Enter to save your settings changes.
- To close the Settings pane, press Esc.