Applies To
You can import data into Excel from a wide variety of data sources and the sections that follow show you how. For more information on what to do with your data once it’s imported, see How data journeys through Excel.WindowsmacOS
From Table/Range
You can create a query from an Excel table, named range, or dynamic array in the current workbook. If the selected data is a simple range, it’s converted to a table. Importing dynamic arrays requires a Microsoft 365 subscription. For more information on dynamic arrays, see Dynamic array formulas and spilled array behavior.
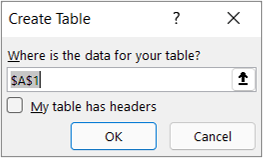
- Select any cell within your data range.
- Select Data > From Table/Range.
This command is also available from Data > From Other Sources > From Table/Range. - If prompted, in the Create Table dialog box, you can select the Range Selection button to select a specific range to use as a data source.
- If the table or range of data has column headers, select My table has headers. The header cells are used to define the column names for the query.
- Select OK.
For more information, see Import from an Excel Table.
File: Excel Workbook
- Select Data > Get Data > From File > From Excel Workbook.
- In the Excel Browse dialog box, browse for or type a path to the file that you want to query.
- Select Open.
If your source workbook has named ranges, the name of the range will be available as a data set.
For more information about advanced connector options, see Excel Workbook.
File: Text/CSV
The following procedure shows the basic steps. For more detailed coverage, see Import or export text (.txt or .csv) files.
- Select Data > Get Data > From File > From Text/CSV.
- In the Comma-Separated Values Browse dialog box, browse for or type a path to the file that you want to query.
- Select Open.
Note: If you are importing data from a CSV file, Power Query will automatically detect column delimiters including column names and types. For example, if you imported the example CSV file below, Power Query automatically uses the first row as the column names and changes each column data type.
Example CSV file
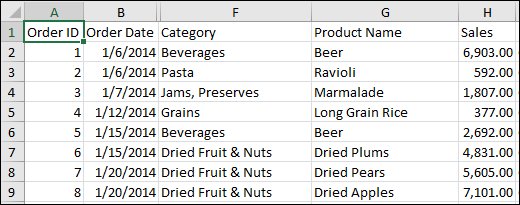
Power Query automatically changes each column data type:
- Order ID changes to number
- Order Date changes to date
- Category remains text (the default column type)
- Product Name remains text (the default column type)
- Sales changes to number
For more information about advanced connector options, see Text/CSV.
File: XML
The following procedure shows the basic steps of importing data. For more detailed coverage, see Import XML data.
- Select Data > Get Data > From File > From XML.
- In the From XML Browse dialog box, browse for or type a file URL to import or link to a file.
- Select Open.
After the connection succeeds, use the Navigator pane to browse and preview the collections of items in the XML file in a tabular form.
For more information about advanced connector options, see XML.
File: JSON
- Select Data > Get Data > From File > From JSON. The Import Data dialog box appears.
- Locate the JSON file, and then select Open.
For more information about advanced connector options, see JSON.
File: PDF
Important When you try to import a PDF file, you may get the following PDF message: “This connector requires one or more additional components to be installed before it can be used.” The PDF connector requires .NET Framework 4.5 or higher to be installed on your computer. You can download the latest .NET Framework from here.
- Select Data > Get Data > From File > From PDF.
- Select your PDF file, and then click Open. The Navigator dialog box opens your PDF and displays available tables.
- Select the tables you want to import, then do one of the following:
- To view the data directly in Excel, Select Load > Load or to see the Import dialog box, select Load > Load To.
- To work with the data in Power Query first, select Transform Data.

For more information about advanced connector options, see PDF.
File: Folder
You can import data from several files having a similar schema and format from a folder. Then, you can append the data into one table.
- Select Data > Get Data > From File > From Folder.
- In the Browse dialog box, locate the folder, and then select Open.
- For detailed steps, see Import data from a folder with multiple files.
For more information about advanced connector options, see Folder.
File: SharePoint Folder
You can import data from several files having a similar schema and format from a SharePoint library. Then, you can append the data into one table.
- Select Data > Get Data > From File > From SharePoint Folder.
- In the SharePoint Folder dialog box, enter the root URL for the SharePoint site not including any reference to a library, and then navigate to the library.
- For detailed steps, see Import data from a folder with multiple files.
For more information about advanced connector options, see SharePoint folder.
Database: SQL Server
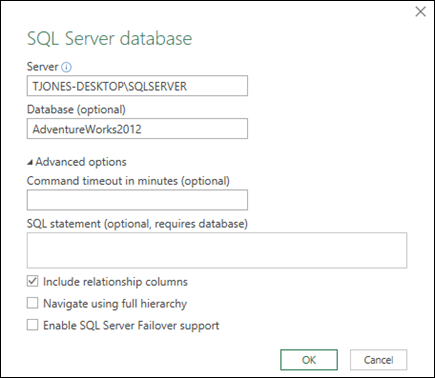
- Select Data > Get Data > From Database > From SQL Server Database.
- In the Microsoft SQL Database dialog box, specify the SQL Server to connect to in the Server Name box. Optionally, you can specify a Database Name as well.
- If you want to import data using a native database query, specify your query in the SQL Statement box. For more information, see Import Data from Database using Native Database Query.
- Select OK.
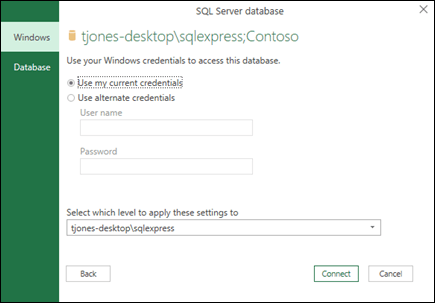
- Select the authentication mode to connect to the SQL Server database.
- Windows This is the default selection. Select this if you want to connect using Windows authentication.
- Database Select this if you want to connect using SQL Server authentication. After you select this, specify a user name and password to connect to your SQL Server instance.
- By default, the Encrypt connection check box is selected to signify that Power Query connects to your database using an encrypted connection. If you do not want to connect using an encrypted connection, clear this check box, and then click Connect.If a connection to your SQL Server is not established using an encrypted connection, Power Query prompts you to connect using an unencrypted connection. Click OK in the message to connect using an unencrypted connection.
For more information about advanced connector options, see SQL Server database.
Database: Microsoft Access
- Select Data > Get Data > From Database > From Microsoft Access Database.
- In the Import Data dialog box, browse for and locate the Access database file (.accdb).
- Select the file, and then select Open. The Navigator dialog box appears.
- Select the table or query in the left pane to preview the data in the right pane.
- If you have many tables and queries, use the Search box to locate an object or use the Display Options along with the Refresh button to filter the list.
- Select Load or Transform.
For more information about advanced connector options, see Access database.
Database: Analysis Services
Note When you use a workbook connected to a SQL Server Analysis Services database, you may need additional information to answer specific product questions, such as reference information about multidimensional expressions (MDX), or configuration procedures for an online analytical processing (OLAP) server.
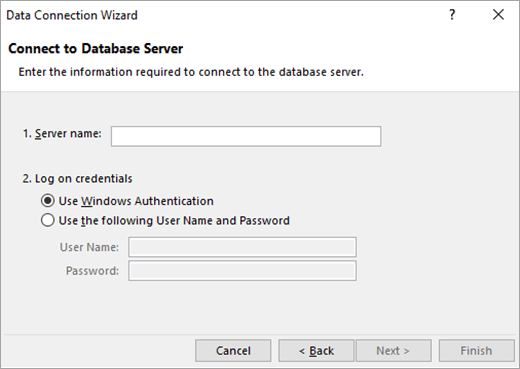
- Select Data > Get External Data > From Database > From Analysis Services. The first page of the Data Connection Wizard appears. Its title is Connect to Database Server.
- In the Server name box, enter the name of the OLAP database server.Tip: If you know the name of the offline cube file that you want to connect to, you can type the complete file path, file name, and extension.
- Under Log on credentials, do one of the following, then click Next:
- To use your current Windows user name and password, click Use Windows Authentication.
- To enter a database user name and password, click Use the following User Name and Password, and then type your user name and password in the corresponding User Name and Password boxes.Security Note
- Use strong passwords that combine uppercase and lowercase letters, numbers, and symbols. Weak passwords don’t mix these elements. For example, Y6dh!et5 is a strong password and House27 is a weak password. Passwords should contain 8 or more characters. A pass phrase that uses 14 or more characters is better.
- It is critical that you remember your password. If you forget your password, Microsoft cannot retrieve it. Store the passwords that you write down in a secure place away from the information that they help protect.
- Select Next to go to the second wizard screen. Its title is Select Database and Table.
To connect to a specific cube file in the database, make sure that Connect to a specific cube or table is selected, and then select a cube from the list.
- In the Select the database that contains the data you want box, select a database, and then click Next.
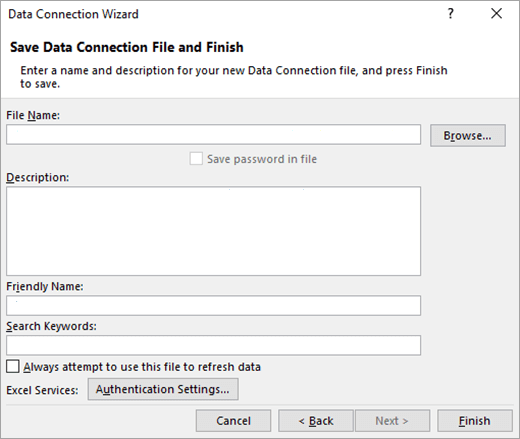
- Click Next to go to the third wizard screen. Its titled Save Data Connection File and Finish.
- In the File Name box, revise the default file name as needed (optional).
- Click Browse to change the default file location of My Data Sources, or check for existing file names.
- In the Description, Friendly Name, and Search Keywords boxes, type a description of the file, a friendly name, and common search words (all are optional).
- To ensure that the connection file is used when the PivotTable is refreshed, click Always attempt to use this file to refresh this data.Selecting this check box ensures that updates to the connection file will always be used by all workbooks that use that connection file.
- You can specify how a PivotTable is accessed if the workbook is saved to Excel Services and is opened by using Excel Services. Note: The authentication setting is only used by Excel Services, and not by Microsoft Office Excel. If you want to ensure that the same data is accessed whether you open the workbook in Excel or Excel Services, make sure that the authentication setting in Excel is the same.Select Authentication Settings, and select one of the following options to log on to the data source:
- Windows Authentication Select this option to use the Windows username and password of the current user. This is the most secure method, but it can affect performance when there are many users.
- SSO Select this option to use Single Sign On, and then enter the appropriate identification string in the SSO ID text box. A site administrator can configure a SharePoint site to use a Single Sign On database where a username and password can be stored. This method can be the most efficient when there are many users.
- None Select this option to save the username and password in the connection file.Important: Avoid saving logon information when connecting to data sources. This information may be stored as plain text, and a malicious user could access the information to compromise the security of the data source.
- Select OK.
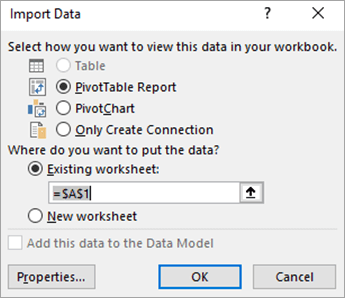
- Select Finish to close the Data Connection Wizard. The Import Data dialog box appears.
- Decide how you want to import the data, and then select OK. For more information about using this dialog box, select the question mark (?).
Database: SQL Server Analysis Services (Import)
You can create a dynamic connection between an Excel workbook and a SQL Server Analysis Services Online Analytical Processing (OLAP) database server, then refresh that connection whenever the data changes. You can connect to a specific offline cube file if it has been created on the database server. You can also import data into Excel as either a Table or a PivotTable report.
- Select Data > Get Data > From Database > From SQL Server Analysis Services Database (Import).
- Enter the Server name, and then select OK.Note: You have the option of entering a specific database name, and you can also add an MDX or DAX query.
- In the Navigator pane select the database, and then select the cube or tables you want to connect.
- Click Load to load the selected table into a worksheet, or click Edit to perform additional data filters and transformations in the Power Query Editor before loading it.
For more information about advanced connector options, see SQL Server Analysis Services.
Database: Oracle
Note: Before you can connect to an Oracle database using Power Query, please ensure all prerequisites are met.
- Select Data > Get Data > From Database > From Oracle Database.
- In the Oracle Database dialog box, in Server Name specify the Oracle Server to connect to. If a SID is required, this can be specified in the form of “ServerName/SID”.
- If you want to import data using native database query, specify your query in the SQL Statement box. For more information, see Import data from database using Native Database Query.
- Select OK.
- If the Oracle server requires database user credentials:
- In the Access a Database dialog box, enter your username and password.
- Click Connect.
For more information about advanced connector options, see Oracle Database.
Database: IBM DB2
Warning:
- Before you can connect to an IBM DB2 database, you need the IBM DB2 Data Server Driver installed on your computer (minimum requirement is the IBM Data Server Driver Package (DS Driver)). Select the driver that matches your Power Query installation (32-bit or 64-bit).
- There are known issues reported by IBM installing the IBM DB2 Data Server Driver on Windows 8. If you are using Windows 8 and want to connect to IBM DB2 using Power Query, you need to follow additional installation steps. Find more information about the IBM DB2 Data Server Driver on Windows 8.
- Select Data > Get Data > From Database > From IBM DB2 Database.
- In the IBM DB2 Database dialog box, in Server Name specify the IBM DB2 Database Server to connect to.
- If you want to import data using native database query, specify your query in the SQL Statement box. For more information, see Import data from a database using Native Database Query.
- Select OK.
- If the IBM DB2 server requires database user credentials:
- In the Access a Database dialog box, enter your username and password.
- Click Connect.
For more information about advanced connector options, see IBM DB2 database.
Database: MySQL
Note: If receive the message “This connector requires one or more additional components to be installed before it can be used.”, you need to download the appropriate ODBC Driver for MySQL to your Windows device from here. For more information, see MySQL Connectors.
- Select Data > Get Data > From Database > From MySQL Database.
- In the MySQL Database dialog box, in Server Name specify the MySQL Database Server to connect to.
- If you want to import data using native database query, specify your query in the SQL Statement box. For more information, see Import data from a database using Native Database Query.
- Select OK.
- If the MySQL server requires database user credentials:
- In the Access a Database dialog box, enter your username and password.
- Click Connect.
For more information about advanced connector options, see MySQL database.
Database: PostgreSQL
Note: Before you can connect to a PostgreSQL database in Power Query, you need the Ngpsql data provider for PostgreSQL installed on your computer. Select the driver that matches your Office version (32-bit or 64-bit). For more information, see Which version of Office am I using? . Also make sure you have the provider registered in the machine configuration that matches the most recent .NET version on your device.
- Select Data > Get Data > From Database > From PostgreSQL Database.
- In the PostgreSQL Database dialog box, specify the PostgreSQL Database Server you want to connect to in the Server Name section.
- If you want to import data using native database query, specify your query in the SQL Statement box. For more information, see Import data from a database using Native Database Query.
- Select OK.
- If the PostgreSQL server requires database user credentials:
- In the Access a Database dialog box, enter your username and password.
- Select Connect.
For more information about advanced connector options, see PostgreSQL.
Database: Sybase
Note: Before you can connect to an SAP SQL Anywhere database, you need the SAP SQL Anywhere driver installed on your computer. Select the driver that matches your Excel installation (32-bit or 64-bit).
- Select Data > Get Data > From Database > From Sybase Database.
- In the Sybase Database dialog box, specify the Sybase Server to connect to in the Server Name box. Optionally, you can specify a Database Name as well.
- If you want to import data using a native database query, specify your query in the SQL Statement box. For more information, see Import data from a database using Native Database Query.
- Select OK.
- By default, the Encrypt connection check box is selected so that Power Query connects to your database using a simple encrypted connection.
- Select Connect.
For more information, see Sybase database.
Database: Teradata
Note: Before you can connect to a Teradata database, you need the .NET Data Provider for Teradata on your computer.
- Select Data > Get Data > From Database > From Teradata Database.
- In the Teradata Database dialog box, in Server Name specify the Teradata Server to connect to.
- If you want to import data using native database query, specify your query in the SQL Statement box. For more information, see Import data from a database using Native Database Query.
- Select OK.
- If the Teradata server requires database user credentials:
- In the Access a Database dialog box, enter your username and password.
- Click Save.
For more information, see Terabase database.
Database: SAP HANA
Notes:
- This feature is only available in Excel for Windows if you have Office 2019 or later, or a Microsoft 365 subscription. If you are a Microsoft 365 subscriber, make sure you have the latest version of Office.
- Before you can connect to an SAP HANA database using Power Query, you need the SAP HANA ODBC Driver on your computer. Select the driver that matches your Power Query installation (32-bit or 64-bit).
- You will need an SAP account to login to the website and download the drivers. If you are unsure, contact the SAP administrator in your organization.
To connect to an SAP HANA database:
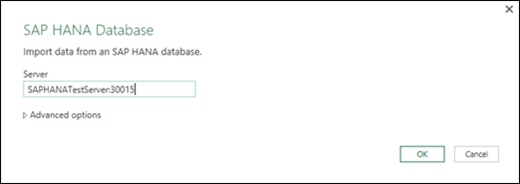
- Click Data > New Query > From Database > From SAP HANA Database.
- In the SAP HANA Database dialog box, specify the server you want to connect to. The server name should follow the format ServerName:Port.
- Optionally, if you want to import data using native database query, Select Advanced options and in the SQL Statement box enter the query.
- Select OK.
- If the SAP HANA server requires database user credentials, then in the Access an SAP HANA database dialog box, do the following:
- Click the Database tab, and enter your username and password.
- Click Connect.
For more information about advanced connector options, see SAP HANA database.
Azure: Azure SQL Database
Azure SQL Database is a high-performing, fully managed, scalable relational database built for the cloud and used for mission-critical applications. For more information, see What is Azure SQL?.
- Select Data > Get Data > From Azure > From Azure SQL Database.
- In the Microsoft SQL Database dialog box, specify the SQL Server to connect to in the Server Name box. Optionally, you can specify a Database Name as well.
- If you want to import data using a native database query, specify your query in the SQL Statement box. For more information, see Import Data from Database using Native Database Query.
- Select OK.
- Select the authentication mode to connect to the SQL Server database.
- Windows This is the default selection. Select this if you want to connect using Windows authentication.
- Database Select this if you want to connect using SQL Server authentication. After you select this, specify a user name and password to connect to your SQL Server instance.
- By default, the Encrypt connection check box is selected to signify that Power Query connects to your database using an encrypted connection. If you do not want to connect using an encrypted connection, clear this check box, and then click Connect.If a connection to your SQL Server is not established using an encrypted connection, Power Query prompts you to connect using an unencrypted connection. Click OK in the message to connect using an unencrypted connection.
For more information about advanced connector options, see Azure SQL database.
