Save a document
Applies To
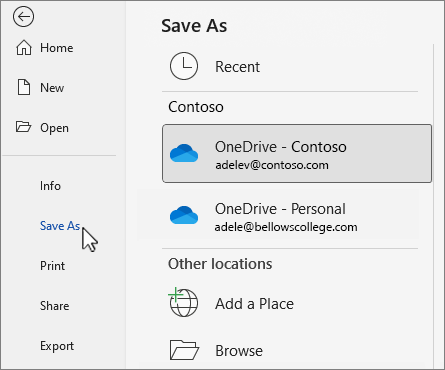
Save your document to OneDrive so you can get to it from anywhere – at work, at home, or on the go. Or save to another location, like your desktop.
- On the File tab, select Save As or Save a Copy.
- In the Save dialog, select OneDrive.
- Update the name and file type if you want, and select
Save. Save personal files to OneDrive – Personal, and work files to your company OneDrive or SharePoint site.
- Select Browse, and navigate to any location including the Desktop.
- Enter a name, and select
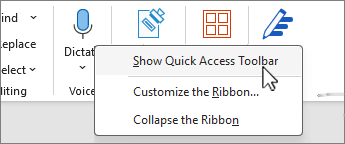
When you save to OneDrive or SharePoint, all your changes are saved automatically. You can turn AutoSave on or off on the Quick Access Toolbar, either above or below your ribbon.

If you don’t see the Quick Access Toolbar, right-click the ribbon, and select Show Quick Access Toolbar.
Note: When your document is stored in OneDrive, Word will save your changes automatically.
Edit a PDF
Applies To
To edit a PDF, open it in Word. This works best with PDFs that are mostly text. PDFs of book chapters or something that looks like a manuscript from a copier won’t be formatted well in Word.
- Go to File > Open.
- Find the PDF and open it (you might have to select Browse and find the PDF in a folder).
- Word tells you that it’s going to make a copy of the PDF and convert its contents into a format that Word can display. The original PDF won’t be changed at all. Select OK.
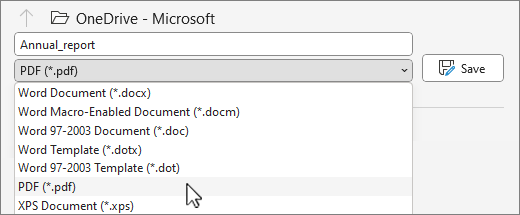
- After your edits, you save it as a Word doc or a PDF. In the Save menu, choose the document type in the Save as dropdown menu and select OK.
Note: The converted document might not have a perfect page-to-page correspondence with the original. For example, lines and pages may break at different locations.
Convert or save to PDF
- Go to Export > Create PDF/XPS Document > Create PDF/XPS.
- Select where you want to save your document, like OneDrive.
- Check Options… to change properties.
- Select Publish.
Create and print a single envelope in Word
Applies To
If you want to include your return address on the envelope, you can set this up before you start working on the envelope.
When you have set up your envelope the way you want, you can print it, as well as save it so that you can reuse it.
What do you want to do?
Set up a return address
- Start Word.
- Select the File tab.
- Select Options > Advanced.
- Scroll down, and under General, type your return address in the Mailing address box.Note: Word stores the address so that you can use it whenever you want to insert your return address in an envelope, label, or other document.
- Select OK.
Verify printing options
Before you run a batch of envelopes through your printer, you can verify that the printer options are set up correctly.
- On the Mailings tab, in the Create group, select Envelopes.
- Select Options, then select the Envelope Options tab.
- In the Envelope size box, select the choice that matches the size of your envelope. If none of the choices matches your envelope size, scroll to the bottom of the list, select Custom size, and then type the dimensions of your envelope in the Width and Height boxes.
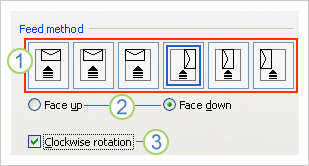
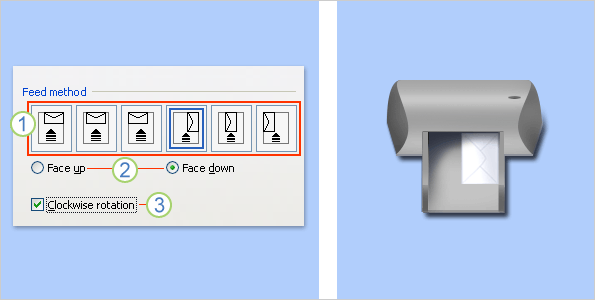
- Select the Printing Options tab.The printer driver tells Word which way the envelope should be loaded into the printer, and this information is displayed in the Printing Options tab of the Envelope Options dialog box.
- The feed method determines the position of the envelope (right, middle, left) and whether the long or short edge is being fed into the printer.
- The envelope can be face up or face down. The face is the side that the address is printed on.
- If the envelope is fed short edge first, the envelope may need to be rotated to prevent the text from appearing upside down on the face of the envelope.
The envelope in the illustration below is positioned to the right, face down, flap at the top, and the short edge is being fed into the printer, in accordance with the settings in the dialog box shown above.
- Load the envelope as indicated in the dialog box.
- Select OK.
- Type some test text in the Delivery address box, and then select Print to print the envelope.
- Verify that the envelope printed correctly.
- If the envelope did not print correctly, do any of the following:
- Consult your printer information, if available, to find out how to load the envelopes into the printer.
- Update your printer driver.
- Go back to the Printing Options tab of the Envelope Options dialog box and make adjustments to the printing options. Print the envelope again. Repeat this process until you discover a configuration of printing options that yields the results that you want.
Create and print or save an envelope
- On the Mailings tab, in the Create group, select Envelopes.
- In the Delivery address box, type the mailing address.If you want to use an address in the electronic address book installed on your computer, select Insert Address
.
- If you want to format the text, select the text, right-click the selected text, and then select Font on the shortcut menu.
- In the Return address box, type the return address or use the preconfigured one.If you want to use an address in the electronic address book installed on your computer, select Insert Address
- If you want to keep the return address for future use, but you don’t want to include it on the current envelope, select the Omit check box.
- If you have access to electronic postage, for example if you purchased it from a service on the World Wide Web, you can add it to your envelope.How?
- Select the Add electronic postage check box.If you do not have an electronic postage program installed, Microsoft Word prompts you to install one and offers to connect to the Office.com site. There, you can get more information and links to other sites that offer electronic postage.
- To set options for the electronic postage programs that are installed on your computer, select E-postage Properties.
- Do one of the following:
- If you want to print the envelope without saving it for reuse, insert an envelope in the printer as shown in the Feed box, and then select Print.
- If you want to save the envelope for reuse, select Add to Document. Select the File tab, then select Save As, and type a name for the document.Word adds the envelope to the current document as Page 1. If you want, you can use the rest of the document for typing correspondence that will automatically be stored with the envelope.To print the envelope, insert an envelope in the printer as shown in the Feed box on the Printing Options tab in the Envelope Options dialog box, and then select Print.
Create and print labels
Applies To
Create and print a page of identical labels
- Go to Mailings > Labels.
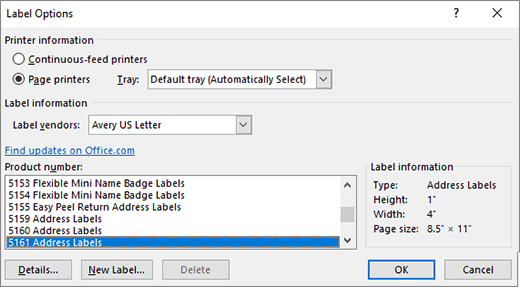
- Select Options and choose a label vendor and product to use. Select OK.If you don’t see your product number, select New Label and configure a custom label.
- Type an address or other information in the Address box (text only).
To use an address from your contacts list select Insert Address
.
- To change the formatting, select the text, right-click, and make changes with Font or Paragraph.
- Select OK.
- Select Full page of the same label.
- Select Print, or New Document to edit, save and print later.
If you need just one label, select Single label from the Mailings > Labels menu and the position on the label sheet where you want it to appear. Select OK, the destination, and Save.
Tip: Print your labels to a sheet of paper before loading labels into the printer to make sure the text aligns with the labels.
Print labels for your mailing list
Applies To
With your address list set up in an Excel spreadsheet you can use mail merge in Word to create mailing labels. Make sure your data is mistake free and uniformly formatted.
We will use a wizard menu to print your labels. Go to Mailings > Start Mail Merge > Step-by-Step Mail Merge Wizard.
- In the Mail Merge menu, select Labels.
- Select Next: Starting document > Label Options to choose your label size. Choose your Label vendors and Product number. You’ll find the product number on your package of labels. Select OK. Tip: If none of the options match your labels, choose New Label, enter your label’s information, and give it a name. Choose OK to add the new label to the Product number list.
- Choose Next: Select recipients > Browse to upload the mailing list. Select your mailing list table and then Open > OK.
- Select Next: Arrange your labels > Address block to add recipient information. Select OK. To replicate the first label, select Update all labels.
- Select Preview your labels to edit details such as paragraph spacing.
- Select Complete the progress. Choose Print > OK > OK to print your labels.
- Go to File > Save if you want to save your document.
Data sources you can use for a mail merge
Applies To
Recipients of a mail merge usually come from a list of names and data in an existing list, like an Excel spreadsheet, or your Outlook contacts list. The existing list could also be any database that you can connect to. If you don’t already have a list, you can type one up in Word as part of the mail merge process.
The list or database is known as the data source for your mail merge.
Choose which type of list you’re going to use as your data source:WindowsmacOS
New list
If you don’t have a data source yet, choose Type a New List, and then use the form that opens to create your list. The list is saved as a database (.mdb) file that you can reuse.
For details about creating a new list, see Set up a new mail merge list with Word.
Existing list
An existing list might be an Excel spreadsheet, Access database, or some other type of database. To use it as your data source, choose Use an Existing List.
Important: No matter what type of file you use as a data source, be sure to save it on your local computer or a file share; saving at an HTTP location isn’t supported for mail merge.
- Excel spreadsheet An Excel spreadsheet works well as a data source for mail merge if all data is well-formatted and on one sheet so that it can be read by Word. For more information, see Prepare your Excel data source for a Word mail merge.
- Access database With Access, you can select data from any table or query defined in the database. For more information, see Use mail merge to send Access data to Word.
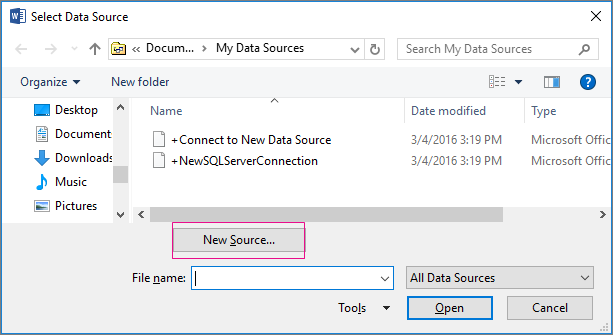
- Other database files To access other kinds of data sources, you’ll run the Data Connection Wizard:
- Go to Mailings > Select Recipients > Use an Existing List, then choose New Source to open the Data Connection Wizard.
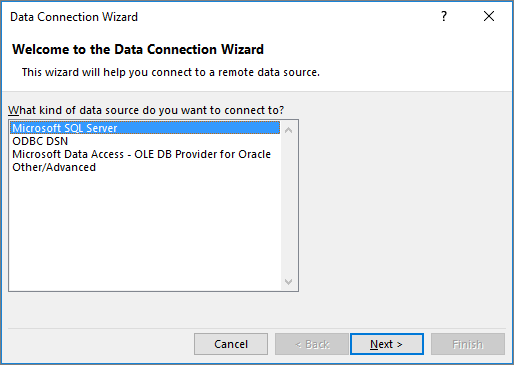
- Choose the type of data source you want to use for the mail merge, and then select Next.
- Follow the prompts in the Data Connection Wizard to complete the data connection to the merge document.
Outlook contact list
You can retrieve contact information directly from your Outlook contact list in Word. To use this as your data source, choose Choose from Outlook Contacts.
Use Outlook contacts as a data source for a mail merge
Applies To
Your Outlook contact list can be the source of personalized information in a batch of Word documents, through Word’s mail merge feature.
- In Outlook, go to Contacts, and select the names you want to include. Or, if you want to include the whole address book, skip this step.
- Go to Home > Mail Merge.
- Choose the options you want, and then select OK.
Note: If you’ve selected a set of contacts that you’ll want to use again without choosing them each time, select Permanent file and give the list a name.
- In Word, on the Mailings tab, insert mail merge fields that pull information from the Outlook contacts list into your document.Tip: The merge field Address Block is perfect for envelopes and labels; Greeting Line works great for personalizing letters and email.
- Add any text that you want on each of the documents, envelopes, labels, or emails. For example, if you’re sending a form letter, this is where you write the body of the letter.
- Choose Preview Results, and then choose Next
or Previous
to see each personalized document, envelope, label, or email.
- To complete the merge, in the Finish group, choose Finish & Merge, and then choose Print Documents or Send E-mail Messages.

Reuse your mail merge
Save the merge document so that you can run it again without having to set anything up. The merge document stays connected to the data source.
When you want to run it again — for example, another batch of envelopes to the same people — go to File > Open in Word, and open the document. Choose Yes when Word prompts you to keep the connection.
